Latest Posts by copperfingertips - Page 6


XKCD’s excellent presentation on historical global temperature and anthropogenic global warming.
[After setting your car on fire] “Listen, your car’s temperature has changed before.”
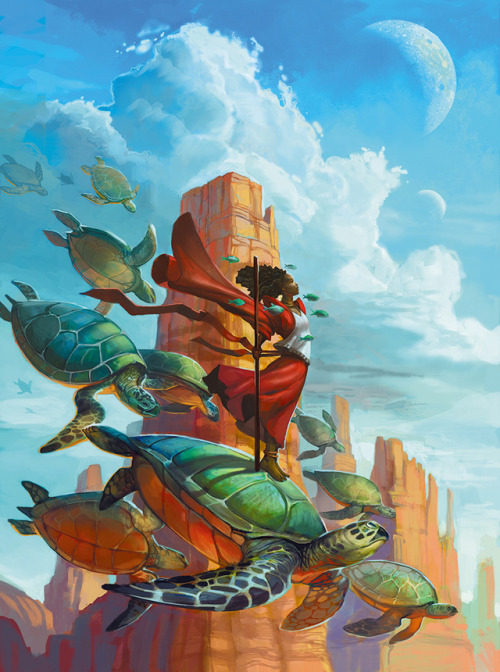
How about a Solarpunk moodboard 🌻🌍

solarpunk……good
solarpunk moodboard for anon


Stunning Conceptual Scarves Mimic the Wings of Birds
Melbourne-based fashion designer Roza Khamitova continuously creates a collection of conceptual scarves, which are inspired by the anatomy of the bird. When each piece is worn as a shawl, it creates the illusion of having enormous beautiful feathers and bird wings.
The stunning illustrations on Khamitova’s pieces are hand-painted and digitally printed on non-toxic and a primarily cotton recyclable material, which is itch-free. You can find more designs and colors of her creations at her Etsy shop called Shovava.
DIY Laundry Detergent
GUYS, THIS WORKED. YOU DON’T EVEN KNOW HOW EXCITED I AM.
My first homesteading project was a roaring success! I know this probably means I’m doomed for failure in the future (ever the optimist, I am), but YAY for now.
!!
Okay, done squealing. Here’s what happened:
I used this recipe from Budget101.com. I had several detergent recipes pinned, but I’m partial to a liquid/non-powder detergent. Especially when said liquid is concentrated (you only need to use one tablespoon per load here).
I did this on Sunday as a weekend project with my mom, and was 90% convinced I was going to have a nasty, sudsy mess all over her stove. But instead, we made THESE:
Aren’t they gorgeous?
But I’m getting ahead of myself again.
Alright.
Ready?
Here’s what you need:
1 cup Borax
1 cup Arm & Hammer Washing Soda
1 bar Fels Naptha
4 cups water
2 1-quart Mason jars
Total cost for 128 loads of laundry: $1.76
Grate the bar of Fels Naptha using a cheese grater (yes, really). It’s super soft, and shouldn’t be too difficult. It will take about five or ten minutes, depending on your pressure and attention span.
Put the 4 cups of water in a LARGE pot (big enough to take on all the ingredients, plus room for a bit of foam) and set it to high, waiting for a boil.
Measure out the Borax and Washing Soda, mix together well in a bowl.
Once the water begins to boil, add the grated Fels Naptha gently, and reduce the heat to medium. Stir constantly until the soap is completely dissolved, about 10-15 minutes. Be careful not to let this boil over, or you will end up with the sudsy mess I was anticipating. This is the extent of foam you should see:
Once the Fels Naptha has melted, remove the pot from the heat and add the blended Borax and Washing Soda. It’s essential you stir constantly here as well, lest you end up with an icky, grainy detergent that could leave residue on your clothes. Stir for about 5 minutes, or until you no longer feel graininess on the bottom of your pot.
Next, pour the detergent equally into your two Mason jars. Add water until the liquid reaches the “shoulders” of the jar (the rounded part near the top). There should be about 1.5 - 2 inches of air space at the top of the jar.
Put the lids on your jars and set them upside down. Leave them like this for 4-5 hours, so they can do their separation thang. Have a Netflix marathon, make a four-course dinner, go for a run, whatever. Just DON’T TOUCH THE JARS until those 4-5 hours are up!
When you come back, they’ll look like this:
Kinda nasty, eh? Just wait – your detergent is about to become oh-so-beautiful.
Grab a mixing bowl and your hand mixer, and empty out the contents of both jars into the bowl. Make sure you scrape the sides of the jar to get all the detergent out. Now whip it! Whip it good!
…until your detergent is light and fluffy.
Ta-da! Transfer back into your (rinsed and dried) jars, and you’re done!
To use, simply add one tablespoon of detergent per load of laundry. Add it directly in with the clothes, no matter what your machine says. Take a spoonful, and put it under the running water, allowing the detergent to run off the spoon onto your dirty clothes. Close the machine up and you’re done!
Notes: Since the soaps are already dissolved in this detergent, it won’t leave any residue on your clothes like other DIY detergents can. Also, at $1.76 for 128 loads of laundry, this one is a real money saver!
Happy Laundering,
Becca, The Semi-Homesteader

How I Got into Backyard Farming
Idea:
Backyard Farming sounds crazy, so let’s try it
What is it?
There is a movement where regular people are turning their backyards into micro farms and doing things like:
Growing all the salad ingredients they need for a year (minus the Russian dressing)
Growing 100 pounds of potatoes on a tiny patio
Raising a couple of chickens for meat and/or eggs
Raising Talapia fish to eat
Raising rabbits or quail for meat
Converting lawns into mini farms producing staple crops like corn and wheat
Using things like fences, walls, posts and garages to trellis things like grapes, squash, beans, and melons
Growing 100 pounds of garlic and selling it for $10 a pound at farmers markets
Raising bees and selling honey for $7 a pound at farmers markets
Making your own Beer, Wine, Meade, Cider or Brandy
Why this could be Awesome:
The goal here is that you do these things on your property without anyone really noticing or caring. The goal is not to start up some “you might be a redneck if” style crazy farm on the lawn and instantly tank the neighborhood housing prices in the process. With this project the goal is to be clandestine, or at least unnoticeable. Do it right and neighbors will compliment how well your property looks as you bring them goodies from the garden all year long. Other reasons this scheme could be awesome:
Lower your grocery bills
Be totally organic and chemical free
Potentially earn income
Less lawn mowing / Less using anything that runs on gas
Could be Fun
My Situation:
I live in a typical Cape Cod house on a quiet street in a medium sized city in Ohio. I have neighbors very close on both sides and in the back. In total I have about 0.3 acres of “land” which consists of a small front yard and a descent sized backyard enclosed in a chain link fence. I have a tiny 1-car garage, a small patio, and normal guy yard tools.
Research Phase:
I went to the library and to the internet and looked up the following topics:
Small space / patio / container gardening
Permaculture / food forests / Organic Gardening
Homesteading / Survivalist / Prepper (I’m not a prepper)
Aquaponics
Take a look at some YouTube videos on people who have backyard food forests. Also Jeff Lawton’s videos on this topic are amazing. I also recommend the book Gaia’s Garden and the website Permies.com
Let’s Do This:
And so when Spring rolled around I began… The plan was to start small and incorporate little things at a time into my landscape, wait until I was used to them and make sure no one freaked out, and then slowly expand.
Things I have Accomplished:
I’m on year three now and I think things are going relatively well. Here’s a summary of things I have been able to do. Note: Each topic below will have its own full post soon.
Toxin Free: Gave up insecticide, commercial fertilizer and other toxins totally.
Compost: Created a composting system that produces about 1 pickup truck load of compost per year.
Waste Reduction: Generate zero yard waste. Generate 1-2 bags of garbage per week, which is a reduction from 5 bags. This reduction is due to composting, canning, burning paper with wood fires and using ashes in garden, reduction of processed foods purchased, etc.
Rainwater harvesting: Made and Installed 2 Rain Barrels (55 gallons each), with a system to auto water the front yard with the flip of a switch using garden hose and gravity
Lawn Reduction: More than half of my front yard is garden (but doesn’t look out of the ordinary at all). Converted 1/3rd of my backyard to garden
Hugelkultur: Installed about 56 feet of Hugelkultur mounds
Heavy Mulching: Threw down 2 dump truck loads of mulch, 3 pickup load of hay (about 40 bales) and 1 pickup load manure.
Sheet Mulching: Experimented with Sheet mulching using cardboard and other materials to convert lawn to garden without digging.
Less Weeds: Cut weeding time down by using mulching techniques as well as chop & drop methods. (you still get weeds, but less, and easier to pull)
No Dig / No till: Gave up Tilling totally. There are many good reasons to do this.
Less Mowing: Mow only about 4-6 times a year (due to letting certain “weeds” grow into the lawn such as clover which doesn’t grow very tall). Also, I mow the front lawn every other time with a gas free reel push mower, which saves gas and is very quiet (and a good workout).
Less Watering: Cut watering in half (because of the rain barrels, a well-placed swale to slow down run-off and Hugelkultur mounds which soak up water like crazy)
Perennial Food: Planted long-term plants such as 2 apple trees, 1 cherry tree, 2 blueberry bushes, 2 raspberry and 2 blackberry bushes, 10 square feet of strawberries, 2 grapevines, 8 asparagus plants.
Quasi Perennial Food: Tomato patch comes back 80% every year from self seeding. Also get a lot of self seeded greens and squash, by not picking everything.
Seed Starting: Beginning to perfect a seed starting regimen that is actually starting to pay off. Seed starting takes practice!
Big Crops: Set to plant about 50 garlic plants this year. Set to plant about 30 potato plants this year (these two plants both can be mixed into the front yard landscape). Planted about 60 mustard green plants (also a beautiful plant)
Medicine: Growing comfrey to be used for medicinal purposes as well as green manure / mulch.
Cool mini-Projects: Things I have made from my backyard include Grape Juice, Vinegar, Tomato juice, Dijon Mustard, Tomato sauce, Roasted Dandelion Root coffee, Echinacea tincture, garlic braids, burn medicine, flower arrangements, and lots of delicious meals.
Things I want to Try:
There are so many things in backyard farming/ urban permaculture I still want to try. Here is my to-do list:
Plant way more fruit trees. The ultimate goal of the permaculture “food forest” is basically to have tons of food growing everywhere on your property that requires little to no maintenance. The hardest part should be picking all of the bounty. Of course a key to this end state is to have lots of mature fruit trees that produce large quantities of high calorie foods year after year. And even in cold Ohio, we can grow so many different kinds of fruit like cherry, apple, peach, plum, apricot and lots of berry and nut trees
Plant a successful cash crop. I want to sell something at the farmers market! I think garlic will be my first attempt because it is 100% maintenance free and 99% guaranteed to come up beautiful. It also sells for a lot of money. So far I have been eating mine, but each year I plant more and more. One other nice thing is that you can space them really close together and plant them almost anywhere on the property, including right out in the front yard. I tried to sell my mustard greens but nobody wanted them :(
Get bees. Although probably not for everyone, I want bees. There is some cost and some work involved, but you get honey, wax and increased pollination, and that is more than enough for me to want to try it.
Meat? I’m not allowed to have chickens or any animal like that in my city. Rabbits could work since they are silent and you could raise them somewhere covert and no one would know you had them. But I don’t think I could kill and clean rabbits I raised. I looked into pheasant and quail but same thing there.
Eggs? I’m not yet to the point where I’m going to defy my local laws and get a couple of chickens for egg productions, but If you are, there is a whole community on the net of covert chicken raisers. The more hip urban cities such as St. Louis have legalized it, so do some research and go for it. Don’t get any roosters unless you want to anger everyone within a 5 mile radius.
More Mulch! Once you get into this hobby you quickly find that your soil sucks. If you have a typical American house your soil is terrible because for the last 50 years your property has consisted of 90% grass which some guy mowed short twice a week and probably dumped mass quantities of weed and feed and other chemicals onto it. All of the clippings were bagged and sent to the landfill and heavy rains continuously washed away any soil that happened to build up. The fix is to throw down tons and tons of organic material like leaves, cut up weeds, hay, mulch, coffee grounds, manure, compost, etc. But if you are a regular person with an office job you probably don’t have access to as much of this organic mulch as you need. I’m always on the lookout on Craigslist for free manure and mulch, but it can be hard to come by. You can grow your own, but this takes time.
Flowers I got so caught up with food that I realized I didn’t plant many beautiful flowers that can serve multiple purposes. I want them for cut flower arrangements as well as for medicinal purposes and sheer beauty. Next year there will be flowers!
Edible Seeds: I also want to get some edible seeds such as sunflower and pumpkin, yum! Per square foot, sunflowers are one of the most productive foods you can grow, calorie wise.
Why do my interests in canning, couponing, and homesteading overlap so often with blogs with titles like ‘The Obedient Housewife’?
How much longer until the utopic Solarpunk future where Capitalism is dead and we all live in ecologically sustainable high-tech forest cities? Asking for a friend.

Actually you know what. Just don’t mow. Get rid of your lawnmower. Turn your whole yard into a wildflower field or an edible garden. Lawns are the invention of the upper class to show wealth through wasted plots of grass that is meticulously tended for no reason other than to be grass. It’s literally an empty plot of land they kept because they had so much money they didn’t need it to grow food. Not using a yard as just a yard is an act of rebellion.
One of the main industries still supporting lawns is chemical pest control companies, and they’re also responsible for the insecticides that crashed the bird populations in the 40s and 50s as well as a lot of what’s killing bees and butterflies now. The herbicides they produce specifically targets “bad” plants like dandelions, buttercups, and clovers, which are plants bees rely on for early spring feeding. Grass is just grass; it would be great for feeding small mammals if people would let it grow more than three inches, but they won’t.
So, yeah. Kill lawnmower culture. Plant some native flowers. Grow some vegetables and fruit trees. Put out bird feeders and bee sugar spots and homes for both. Be kind to bugs and birds and rabbits and opossums and whoever else might wander by. Make your neighborhood a lot more beautiful.
Hey, listen: We’re not gonna get anywhere with this “socialism” stuff unless we can establish solidarity networks that provide real, tangible aid. And I do mean “tangible” in the sense of “you can fill up a box with it.”
Back in the old-timey days, when we didn’t have things like a minimum wage or government assistance, folks didn’t think twice about paying union dues every month out of their meager paychecks. And in those days, when it was a regular, everyday occurrence for union people to get beat up or outright murdered for their union-ing, the unions still managed to win a lot of their fights. Reason for all that? The bigger part of them union dues I mentioned *went into a strike fund*.
Time on a picket line means time off the clock. And as for me, in this economy, if I go a week without a check, my family don’t eat. I go two weeks without a check, and we’re homeless. And them’s the brakes.
Hey solarpunk community! In light of several posts that have been going around, I was thinking it would be worthwhile to talk about the real, physical things we can do to make this world a more solarpunk place. Because speculation and aesthetics and thinkpieces are awesome, but a movement isn’t a movement without real action behind it. So what are things we can all do to make the present closer to our solarpunk future?

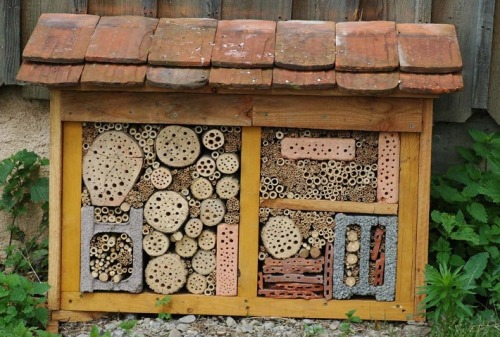
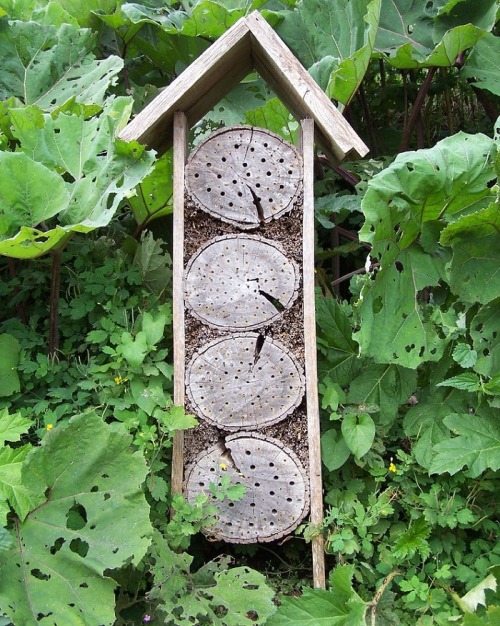

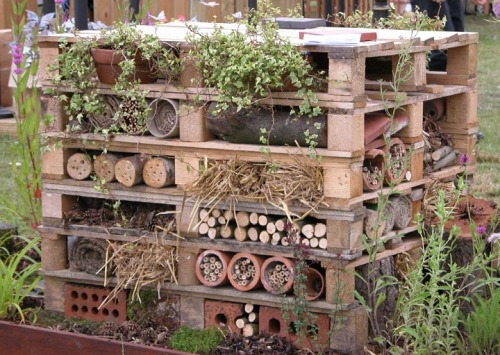

Insect Hotels
Over 30% of solitary bee species are wood nesters, some spending up to nine months of their lives as larvae incubating in forest deadfall. Ladybugs hibernate over winter in stacks of twigs, and other beneficial creatures – like wasps, lizards, moths, hedgehogs, beetles, and dragonflies – love to find little nooks and crannies to hide from predators and the elements, at any time of year.
An insect hotel is ideally placed in a sheltered location, but still in the sunlight. Ants sometimes eat bee larvae, so a solitary bee hotel is best placed off of the ground. Often, a wire mesh is placed on the outside to prevent bird predation. Ideally, the surrounding area should host flowering and insectary plants, to provide food for the guests!
These natural habitats are often missing from a domestic or overly-landscaped garden, and are absolutely vital to the health of your plants, local life web, and for the pollination of your garden. Designing for your native wildlife is crucial for a long-term healthy, productive, and sustainable space. Good, ecologically-minded design also minimises the amount of work you have to do: for example, I find that when I practice companion planting with insectary Apiaceae-family plants, I never have an aphid problem, because predatory beetles abound, and they eat problematic insects before they get established. Creating balanced ecosystems is a form of biological pest control.
An insect hotel is easily made from twigs, wood, tiles, pinecones, bricks, bark, grass, and other natural or salvaged materials. The form can differ, depending on what sort of creatures you would like to attract, and your aesthetics, but it should basically be designed from a “bug’s eye” view of the world: research what your local species are and what they require in terms of a habitat, and then create it for them in a manner that appeals to your eye.
These are also excellent projects for kids: they are fun and easy to make, interesting to observe, and help foster an early understanding of biology and ecology.
#DIY #bees #insects #entomology #biomimicry #permaculture #kids #art
Pre-made insect hotels: North America / Europe
Images:
B. Alter - Royal Bank of Canada New Wild Garden at the Chelsea Flower Show
sav-überlingen.de
Sissi de Kroon, flickr.com
Insect hotel in Hoofddorf, Holland. Bob Daamen, flickr.com
Cheshire Wildlife Trust, cheshirewildlifetrust.org.uk
Kevin Smith and Lisa Lee Benjamin. floragrubb.com
Inspiration Green Article on Insect Hotels

Start a 1-Acre, Self-Sufficient Homestead
Expert advice on how to establish self-sufficient food production, including guidance on crop rotations, raising livestock and grazing management.
By John Seymour
Illustration by Dorling Kindersley
Can't afford to buy things for your garden?
*Re-posting, with new information
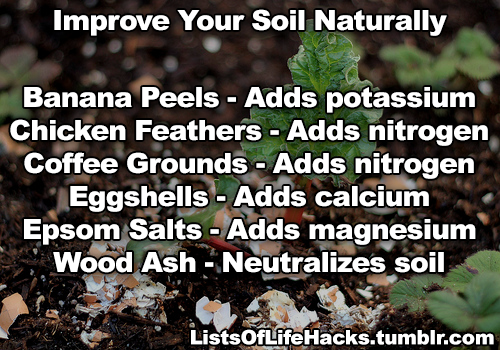
A store-bought bag of topsoil, a roll of landscaping fabric, or a bag of cedar chips doesn’t go very far if you have a large garden or a very limited budget. Here are some ways to create the materials you need for a beautiful, organic, productive garden, by both re-directing household waste, and foraging in your local area. I use a lot of these tricks in my garden to make it almost completely free for me to continue growing new things, and expanding the workable area every year!
For soil
Save your food scraps to create a rich compost for growing veggies and amending your soil. There are numerous options for every size of dwelling and yard. Small space solutions such as Bokashi and vermicompost work indoors and don’t produce bad smells, so you can keep them underneath the sink.Worm towers, compost heaps, and outdoor compost bins are a great solution if you have more space. The more you add, the more rich, nutritious material you can make for your garden. I like composting because it means I don’t have gross smelly garbage bags to deal with, because food waste is diverted. It seems like a lot of work at first, but it actually saves time, money, and transportation.
Seaweed or kelp is one of the best things for your garden, with over 70 essential nutrients, and acting as a weed barrier and a moisture-retentive mulch. I collect seaweed nearby on the beach with my bike trailer, or, when I go for a walk I bring a little home with me each time. It’s an absolute miracle for your soil.

Worm tower
Fertiliser
There are three things that are essential for plant growth. These are nitrogen for leaves and vegetation (N), phosphorus for roots and shoots (P), and potassium for water movement, flowering, and fruiting (K). Commercial fertilisers will give the relative concentrations of each of these compounds with and “NPK” rating. Plants like tomatoes also need calcium to produce healthy fruit. You can create amendments for your garden and soil at home so that you do not have to purchase fertiliser.
For nitrogen
Grass clippings contain 4% nitrogen, 1% phosphorus, and 2% potassium (NPK = 4-1-2).
Human urine contains 12% nitrogen, and it’s sterile. Dilute before adding directly to plants.
Legumes such as beans, clover, peanuts, and alfalfa fix inorganic nitrogen into the soil with mycorrhizal organisms and nodules on their root systems. Plant these crops every few years in rotation with others to renew the soil organically.
For phosphorus
Human urine is also a great source of phosphorous and trace amounts of potassium.
Ground up bones or shells add a slow-release phosphorous to the soil
Had a baby recently? Bury the placenta in the garden.
For potassium
Hardwood ashes
Composted banana peels
For calcium
Break down all of your eggshells, or seashells you have found, in a plastic bucket, using vinegar. This creates a soluble calcium solution you can add to a watering can.
Soil Acidity/Alkalinity
Many plants are particular about what the soil pH should be.
To make soil more acidic: add oak leaves, pine needles, leaf mulch, urine, coffee grounds or sphagnum.
To make soil more alkaline: add wood ash, shell, or bone.
Mulch
Mulch is decomposing organic matter that adds nutrition to the soil, while simultaneously keeping out weed growth and retaining moisture. It also attracts worms, fungi and other beneficial creatures to your soil. Free sources of mulch include:
Leaves
Garden waste
Grass clippings
Straw (often straw bales are given away after being used for decoration in the fall. You can also plant vegetables directly in straw bales using a technique called straw bale gardening).
Wood chips (if you can borrow a wood chipper after you’ve collected some wood you can have attractive wood mulch for free)

Straw bale garden
Landscaping fabric
When mulch isn’t enough to keep the weeds down, many people opt for landscaping fabric. It can be quite expensive and inorganic-looking. Free solutions that both attract worms and can be replaced in small segments as they break down include:
Newspaper*
Cardboard*
Egg cartons*
Printer paper, looseleaf, etc. in thick layers*
*try to make sure you are using paper that has vegetable-based dyes, so you aren’t leeching toxins into the soil.
Soil density/drainage
If your soil is compacted and you have plants that require low levels of water, or excellent drainage, add sand. I don’t recommend stealing it from the beach, but ask around and you’d be surprised at how easy it is to get for free. Sawdust also improves drainage. Adding organic matter and mulch encourages worms, who also till and aerate compacted soil.
If the area still needs drainage, dig a hole and fill it with bricks or rocks to create a “dry well”
For drainage in pots, add crushed bricks, terra cotta pot fragments, packing peanuts, small stones, marbles, orsand to the bottom under the soil layer. I find these in construction sites, on craigslist, or at flea markets.
Pots and growing containers
If you have space, raised beds are a great no-dig way to establish growing space. If you are pressed for space (like working on a balcony) there are many cheap or free options for container gardens.
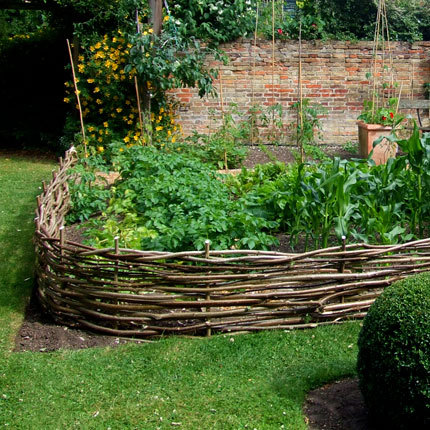
Creating raised beds allows you to build up the soil without digging. Free ways to do this include using rocks or lumber (like my DIY “lasagna garden” made with the sheet composting technique), using the “wattle“ method with sticks and posts you have found, using discarded straw bales, old bricks,paving stones, cinder blocks or really anything else you have lying around.
Hugelkutur raised beds, which fix carbon and provide drainage, can be made by stacking sticks and untreated wood, and then piling soil or compost over it. (Thanks milos-garden)
Rubber tire gardens retain heat in the night and allow for great drainage. They can also be painted in fun ways.
Herb spirals (here is mine: 1, 2, 3) can be built with stones, bricks, and other found materials.
I often use old cooking pots, barbecues, teapots, or other found objects as planters.
Making wooden planters is easy, and scrap or salvaged wood is also easy to come by. I’m not a fan of using wooden pallets for DIY projects, but they are also a free source of lumber for things like planters.
If you can track down peat moss, cement, and vermiculite, you can make an easy Hypertufa planter in whatever shape you would like, provided you have a form in which it can dry.
I’ve made hanging gardens out of soda cans.
You can build a self-watering container with a 2L pop bottle.
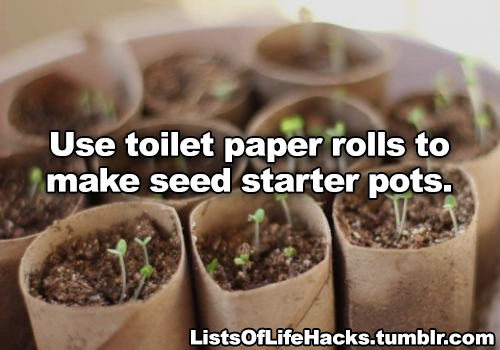
Start seeds in eggshells
Make biodegradable pots out of newspapers.
Wattle raised beds

Rubber tire gardens

Hugelkultur

An herb spiral
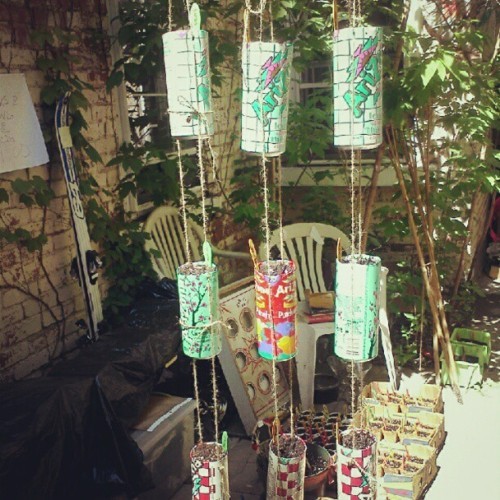
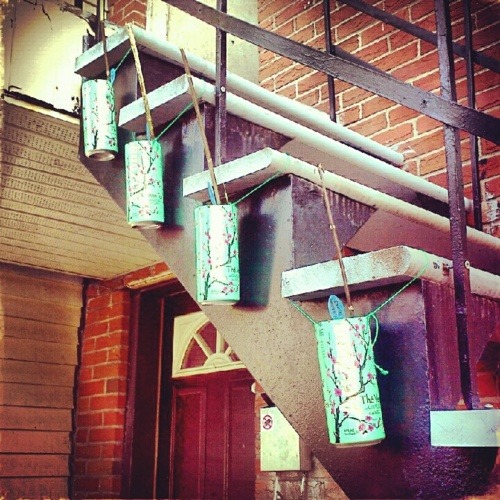
Hanging gardens in cans (2)
Trellises and supports
Many plants need external support, such as stakes of trellises, to thrive.
Rebar can almost always be salvaged cheaply or free and makes a great trellis, arch, or purgola
Build trellises and supports out of the pliable young stems of plants like willow
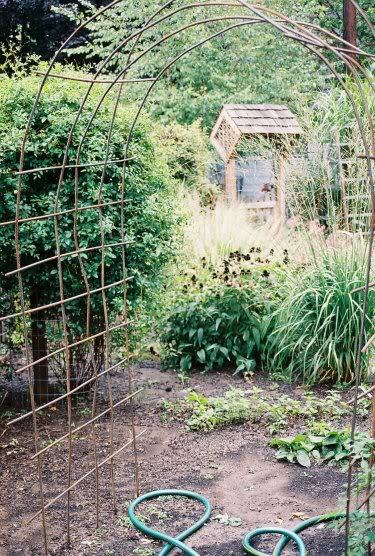
Rebar trellis/arch

Living willow arch/trellis
Paving
Paving often requires a foundation of sand or another stable and well-drained substrate, and a covering of stones, bricks, or other weatherproof elements. Slowly collect stones over time, or free paving stone fragments to create a mosaic-type walkway. Often people give these things away on craigslist. I made a patio and fireplace out of free salvaged bricks, for example.

Salvaged garden walkway
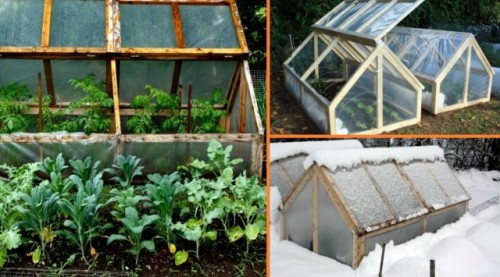
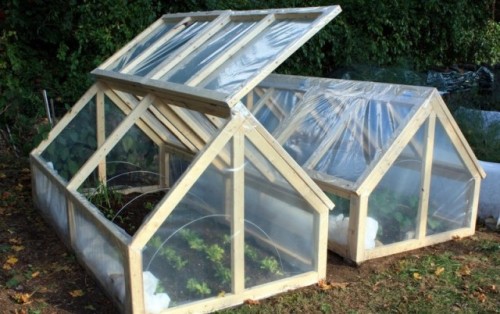
Greenhouses and cold frames
Here is a gallery of greenhouses made out of salvaged windows and doors
A cold frame is easy to make with salvaged lumber, and plastic sheeting.
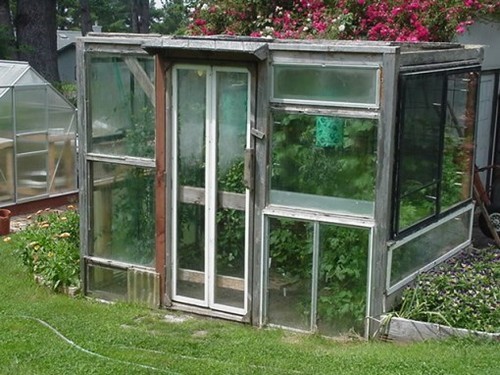
Window greenhouse
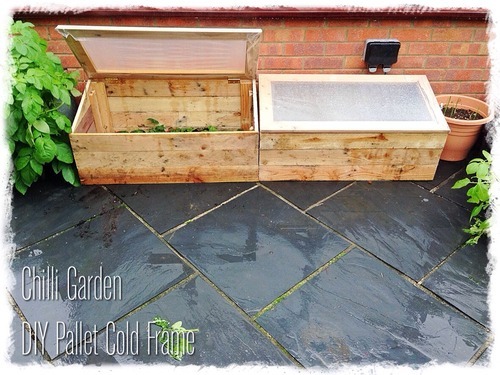
Palet cold-frame
Seeds and plants
Swap seeds with other gardeners
If you see a plant you like at someone’s house, ask for seeds or cuttings
Save seeds every year and build a library of options. Here is a great guide to seed saving.
Save seeds from foods you like from the grocery store: consider growing peanuts, ginger, garlic, peppers, or a walnut tree: all of these and more can be planted from store-bought produce.
Learn to take cuttings. There is a tonne of info on the web about basic cutting propagation, layering, (like I do with rhododendrons) air layering, and numerous other techniques to take clones of plants you like. This saves going to a nursery and shelling out big bucks for all the variety you want.
For cuttings, willow tea and honey are great rooting hormones/antiseptics/anti-fungal agents, which can save you $40 if you were thinking of buying commercial rooting hormone.
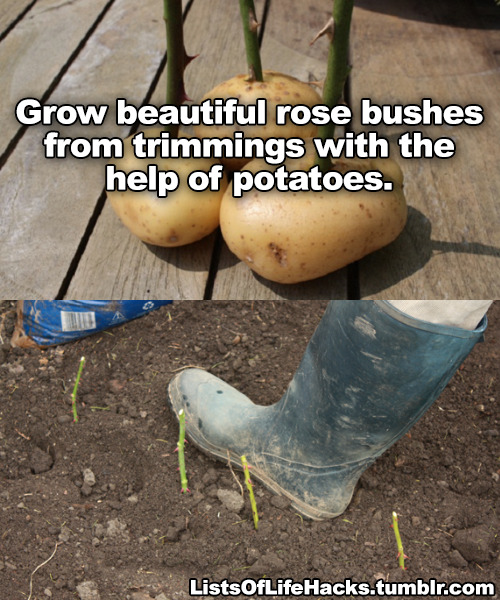
You can root cuttings in a potato! (See my methods for rooting “borrowed” plants here)
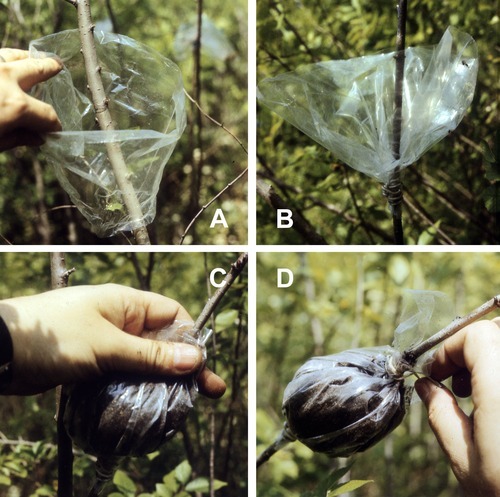
Air layering
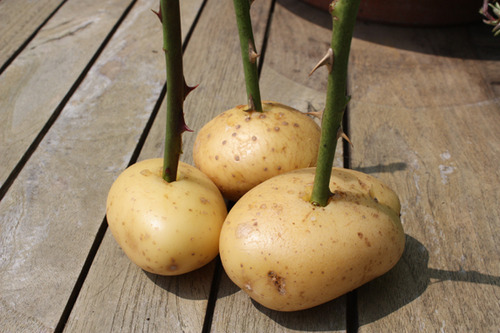
Rooting cuttings in potatoes
—-
I hope this helps you build your garden outside of the usual capitalist channels! It can be a cheap or free hobby if you are willing to think outside the box, and maybe put up with things that don’t look as clean or crisp as a hardware store catalogue. If you have any further ideas, please add them! The more information the better.
Speaking about alternative ways of growing things, have you seen the bottle tower gardens invented by Willem Van Cotthem? His youtube videos are a bit amateurish but the plant results look amazing. I prefer straight up recycling plastic bottles but that IS a neat upcycling idea and it's a water-efficient and space-efficent way of gardening 8D
Oh nice, I hadn’t seen these before, but they look ingenious!

A great way to repurpose waste plastic too, especially as not everywhere has plastic recycling facilities. The water efficient part is appealing too. Solutions like this would be helpful for people living in more arid climates!
Here’s a quick DIY guide for anyone who’s interested.

Day 1612 - We use Imperfect Produce for most of our fruits and veggies at the moment. I’ve always loved that most of their produce comes loose in the box and I appreciate that they recently started prominently labeling the items that would come in plastic.
fucked up how cooking and baking from scratch is viewed as a luxury…..like baking a loaf of bread or whatever is seen as something that only people with money/time can do. I’m not sure why capitalism decided to sell us the idea that we can’t make our own damn food bc it’s a special expensive thing that’s exclusive to wealthy retirees but it’s stupid as hell and it makes me angry
Hey y’all! I wanted your opinion on something. My laptop for the past five years has died, it’s dead and gone. And I was wondering would it be best for me to just get some cheapo $200 computer and hope for the best or save up for like a $400 $500 computer that’ll last me for longer and treat me better? By the way I am like a first year college student who has access to computers on campus. And I already went to a computer technician who is backing it for like $50, so my files are not lost.
This is one of the oldest conundrums of personal finance: to spend a small amount of money on a bandaid solution NOW, or save up for a long-term solution later. We wrote about the dilemma here:
It’s More Expensive to Be Poor Than to Be Rich
Personally, if you can get by using the computers at school, then I would save up another few hundred dollars to buy the higher quality computer that will last longer. It’ll be cheaper in the long term, and you’ll rest easy knowing that you won’t have to deal with another computer combustion any time soon. Good luck!
i think one of the things i want to start learning in 2018 is how to make clothes. how do you start doing that?
sewing is one of those skills everyone with the ability should know IMO. i’ve known too many people who just throw out perfectly servicable clothing and bedding because of tears or buttons that have fallen off and these can be fixed at home. sewing’s not hard either.

How to build a solar greenhouse heater using old beer cans

Repair Cafés
Repair Cafés are free meeting places and they’re all about repairing things (together). In the place where a Repair Café is located, you’ll find tools and materials to help you make any repairs you need. On clothes, furniture, electrical appliances, bicycles, crockery, appliances, toys, et cetera. You’ll also find expert volunteers, with repair skills in all kinds of fields.
Visitors bring their broken items from home. Together with the specialists they start making their repairs in the Repair Café. It’s an ongoing learning process. If you have nothing to repair, you can enjoy a cup of tea or coffee. Or you can lend a hand with someone else’s repair job. You can also get inspired at the reading table – by leafing through books on repairs and DIY.
There are over 1.500 Repair Cafés worldwide. Visit one in your area or start one yourself!
Read more…
when the capitalists die out either thru global warming or revolution will we be able to start homegrown internet


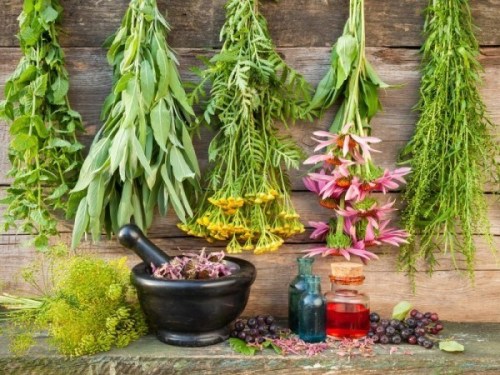
A Practical Guide to Herbology
Lesson One: Medicinal Teas
When I was first starting out with herbology, I was living in a small village in Croatia with a total population of less than 100 people. We depended on homemade teas, salves and medicines to heal us since the nearest hospital was two hours away. We treated ourselves with the power of herbs, gifted to us by the Earth.
These days, we can purchase all the tools we need to grow both common and exotic plants. Dried herbs are also another good option, especially for those that cannot grow their own. And with these tools, we can craft our own medicines.
For the first lesson, I’m going to focus on something simple: the art of crafting medicinal tea.

Creating Tea Blends
When starting out with creating medicinal teas, it’s important to understand how each ingredient interacts with our bodies. Be sure that you’re not allergic to any of your herbs and that they won’t interact poorly with any prescribed medications that you’re on. For example, those who are diabetic should not take angelica root; folks who are allergic to ragweed should avoid chamomile.
Here’s a list of common herbs and their functions for the purposes of crafting medicinal teas:
Angelica Root: Soothes colds and flu, reduces phlegm and fever. (Do not use if you are diabetic)
Basil: Eases headaches, indigestion, muscle spasms, insomnia; reduces stress and tension
Blackberry Leaves or Roots: Reduces diarrhea
Catnip: Soothes teething pain, colic, diarrhea, indigestion, anxiety, insomnia. (May cause drowsiness. Avoid if on Lithium or sedatives)
Calendula (marigold): Reduces fevers, soothes indigestion, gastrointestinal cramps, flu; antiseptic. (May cause drowsiness. Avoid if on sedatives)
Cayenne Pepper: Soothes coughs, colds, arthritis (topical), nerve pain, fever, flu; expectorant. (Avoid taking with medications that contain Theophylline).
Chamomile: Reduces insomnia, anxiety, stress, fever, indigestion; aids with sleep and pain relief. (May decrease effectiveness of birth control pills and some cancer medications, may increase the effects of warfarin; avoid if you are taking medications for your liver)
Cinnamon Bark: Soothes sore throats and coughs; anti-inflammatory (Avoid taking with diabetes medications)
Dandelion Root: Detoxifying, aids digestion, relieves constipation, laxative. (Avoid if on antibiotics, lithium or water pills)
Dandelion Leaf: Mild diuretic, potassium-rich (Avoid if on medication for liver)
Elderberries: Wards off colds and flu
Ginger: Eases morning sickness, nausea, colic, indigestion, diarrhea, fever, sore throats. (Avoid taking with medications that slow blood clotting)
Ginkgo: Relieves anxiety, vertigo, tinnitus; improves circulation, helps concentration; helps PMS. (Avoid taking with ibuprofen or with medications that slow blood clotting; numerous medications have interactions with ginkgo so speak to your specialist before use)
Ginseng: Aphrodisiac, mild stimulant, boosts immune system. (Do not take with medications that slow blood clotting, and avoid taking with diabetes medications or with MAO inhibitors)
Goldenrod: Relieves gout and cramps
Lavender: Reduces anxiety, headaches, tension, stress, indigestion, IBS; antibacterial; antiseptic; disinfectant (May cause drowsiness; avoid if on sedatives)
Lemon balm: Relieves anxiety, cold sores, colic, insomnia, restlessness, indigestion; boosts memory (May cause drowsiness, avoid taking with sedatives)
Nettle: Reduces hay fever and arthritis; diuretic. (Avoid taking with diabetes medications, medications for high BP, sedatives, medications that slow blood clotting, and lithium)
Peppermint: Relieves nausea, anxiety, indigestion, IBS, colic, diarrhea, fever, coughs, colds; anesthetic (Avoid if you have acid-reflux disease; avoid taking with cyclosporine; avoid if on liver medications)
Pine Needles: Expectorant; antiseptic; relieves coughs, colds, fever and congestion
Rosemary: Improves focus, memory, concentration, BP, circulation; antiseptic; antidepressant; eases indigestion
Thyme: Antibacterial, antiseptic, eases coughs and colds, expectorant (Do not take with medications that slow blood clotting)

Recipes
For those starting out, here are a few recipes for common ailments. As you start making your own teas, you’ll learn which blends of herbs work best for your body. Keep track of which ingredients and combinations are successful - with each steep, you get closer and closer to crafting your perfect personalized medicine cabinet.
Anxiety Relief - ½ tsp chamomile - ½ tsp lemon balm Cold Relief - ½ tsp elderberry flower - ½ tsp thyme Mood Booster - ½ tsp lavender - ½ tsp catnip - ½ tsp rosemary Cramp Relief - ½ tsp basil - ½ tsp calendula (marigold) - ½ tsp goldenrod Indigestion Relief - ½ tsp ginger - ½ tsp lemon balm - ½ tsp peppermint Expectorant - ½ tsp pine needles - ½ tsp nettle leaf - ½ tsp angelica root Insomnia - ½ tsp chamomile - ½ tsp catnip - ½ tsp lavender Sore Throat Relief - ½ tsp cinnamon (or half a stick) - ½ tsp ginger - 1 tbsp honey Fever Break - ¼ tsp cayenne pepper - ½ tsp angelica root Flu Relief - ½ tsp calendula (marigold) - ½ tsp lemon balm
—————————————————————————–
Photographs are under the Creative Commons License. Content is from my grimoire and is embedded with information from a variety of sources over the years.
Updated 7 March 2018 with relevant warnings and to be consistent with other posts in this series.
Warnings: All plant material should be sourced appropriately and responsibly for your own safety and well-being. Be certain that you are purchasing food-grade ingredients from a reliable retailer or supplier. Along these lines, not all dried herbs are meant for consumption so please be on the lookout for “external use only” labels - you do not want those products for this.
Do your own research regarding medicinal plants and usage, especially if you are sensitive or have allergies of any kind. If you are on medication(s), consult a doctor before use.
Finally, medicinal teas are a health supplement and not a substitution for professional medical and psychiatric aid. If you are experiencing any prolonged health and/or mental health issues, SEE A DOCTOR.