Your gateway to endless inspiration
Art Ref - Blog Posts
Digital Painting: tips for beginners
Heyo! I got asked if I could make a tutorial on digital painting so I’m gonna throw together some advice meant for people who are starting out and want to figure out exactly how this stuff all works. Because it’s hard! What I hope to accomplish here is to make painting more approachable for you.
Firstly, I have put together something like this before, so for archival purposes here it is: http://holy-quinity.tumblr.com/post/89594801811/i-dont-know-how-much-of-this-kind-of-thing-you
For those of you who don’t wanna bother reading that, here are the main points:
1. Learn your program and its tools, from brush properties to layer styles. And I mean learn them. Make a cheatsheet that shows you exactly what each button and scale does, both in isolation and in conjunction with other buttons and scales. Refer to this as much as possible until it is intuitive. The end goal is to know exactly what to do to your brush’s settings to achieve a given effect.
2. It’s perfectly okay to use your sketches, linearts, and other forms of line in your paintings. They can help guide the form and there’s no need to make something fully “lineless”! I never make things “lineless.”
3. Study other people’s art and try to think how they could have possibly achieved the effects they did. You can learn a lot just by observing and mentally recreating the process stroke by stroke—muscle memory is a powerful tool at your disposal. This becomes easier to do once you’ve started doing item 1 above.
OKAY!
So where the heck do you even begin?
What I’m gonna do is try to make digital painting as approachable as possible for someone who’s never really done it. The main idea here is that digital painting is just like real painting. So if you’ve ever done real painting, you already kinda know what’s coming.
I’m gonna assume you know the basics of digital art: you can sketch, line those sketches using layers and opacity changes, and fill the lines with color, maybe even opting to add some shading…and you’ll get something like this:

You know, cell-shaded, or maybe the shading’s blended, but you’ve still obviously a line drawing with color put down on layers beneath the lines.
The next intuitive step is to try going “lineless”…but when you remove the lines you get this:

idk about you but I’m laughing at how stupid this looks
When I was first teaching myself to paint digitally, I didn’t really know how to deal with this. Without lines, the form of the subject vanished or became a mess like the above. Even if I was meticulous and careful about placing down the color such that without the lines layer turned on, the shapes fit together, it didn’t look quite right. There’d be gaps, I wouldn’t know how to incorporate the subject into a background, the contrast wouldn’t be high enough, or it’d just in general look too much like a screenshot from Super Mario 64.
Painting requires a different process than the above. You’ll have to let go of some of your habits and conventions. Such as staying in the lines. Such as fully relying on the lines. Like, I love my lines, I love my sketches—but in painting, they are guides for form, and are not the form itself. So let me go through how I approach a given painting:

My painting process starts with a sketch (here a boring portrait for demonstrative purposes). I make the opacity of the sketch layer something like 30%, and then throw down my base colors on a new layer underneath. I’m not being meticulous about the sketch itself, because again it’s just meant to guide my placement of color. I’m also not meticulous about my placement of the color.
We’re essentially sketching with color. Because ultimately what we want is for the color to take on the form and shapes conveyed by the sketch.
There’s a lot going into this about how to use value, how to shade, how to use color, etc. that I’m kinda skipping over because it takes a lot of time to explain…but there are hundreds of tutorials out there on those topics so please, google around! I found some helpful tuts that way when I was starting out.
Something I find v useful is to keep selecting colors that already exist in your image for shading and hue adjustment. This is why I start with really blendy, low-opacity brushes when throwing down color on top of the background. I can then select colors within there that are a mix of the two.
For instance, I’ll select the color of the lines here:

…and use that to shade:

And maybe I’ll select one of the darker shades around his eye, but not the darkest, to make the shading a smoother gradient…and so on.
What I do in general at this point is go over the shapes and lines of the sketch. Such that I can turn off the sketch layer and see this:

I’m replacing the lines with shading and value. I’ll continue to do this as I keep adding color.

This is all super loose. I am not dedicated to any particular stroke. I just want the colors and shading and light source to be right. I’ll use overlay layers to boost contrast or add a hue.
Here are other examples where I used this process:


I am constantly changing brushes and brush settings as I paint. It really depends on what effect I want where. I am also constantly selecting new colors and applying or blending those in. I don’t believe in having some uniformly applied base color and then shading with only one or two…that’s what I’d do if I was cell-shading like the first drawing I showed you here, but painting should be about messing with color and opacity and blending to make millions of hues!
Good rule of thumb: Hard, opaque brushes for applying color. Soft, dilute brushes for blending colors. Sometimes hard, dilute brushes can make some cool blending effects! I personally prefer harder edges on my shading so that’s a brush I use often.
This is getting a bit long so I’m gonna split it up into multiple parts, but really what I want you to get from this is:
1. learn the tools at your disposal until they are intuitive
2. sketch and line are guides for form, not the form itself
3. rather, hue and value will produce the form
And of course, practice makes perfect!!! Every drawing you make, every painting you make, will bring you one step closer to the artist you want to be, and thus every drawing and every painting, no matter what, is a success.


Attention anyone who needs hairstyle references
I want to introduce all of you to this amazing place called the ukhairdressers style gallery.
It’s basically a massive database full of high-quality images of different hairstyles. I mean, look at all the options in that sidebar (and part of it’s cut off):

In total they have 976 pages of hairstyles with about 17 styles each, that’s about 16592 hairstyles to look at.
Look at all the stuff they’ve got! Long hair:

Short hair:

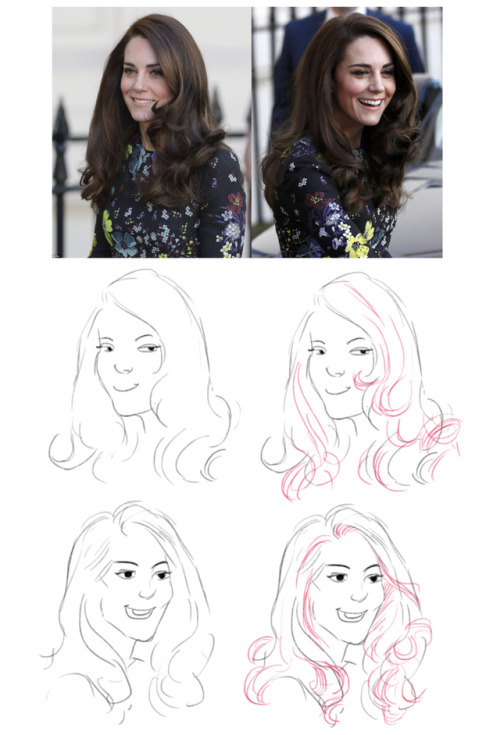
Straight hair:

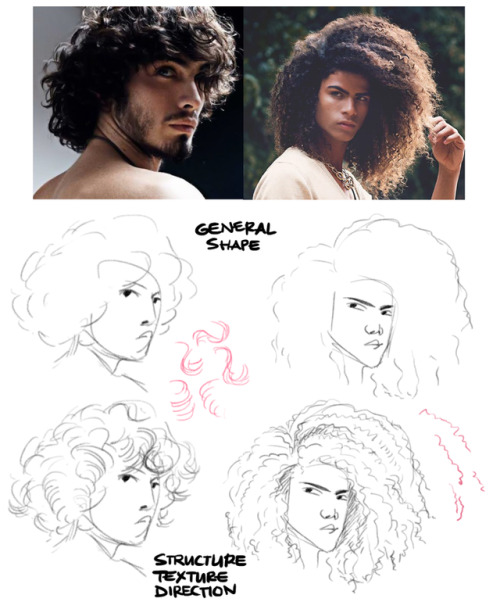
Curly hair:

Afro hair:

Men’s hair:

Hair on older models:

Extra-fancy hair:

Even crazy avant-garde hair:

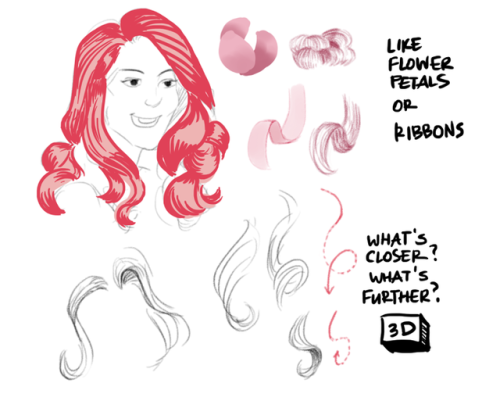
So if you need help with designing a character or you just want to practice drawing hair, this is a fantastic resource.
Art-Res Start Here
Help me keep Art-Res running for years to come!
> buy me a coffee / patreon
> art commissions @astrikos )
> book 1:1 tutoring/question session
> Buy the Art-Res Anatomy Ebook!
> Link Tree
Sharing this blog w/your homies also helps a ton!
Start here!
Join our community - networking + discord invite!
Art Book Recommendations
anatomy masterpost
perspective masterpost
Resources to help you master color theory & color theory primer
Beginner’s Guide to Digital Art
Beginner’s guide to traditional art
Ultimate guide to photography for beginners
How to find and develop artistic style
Surefire Ways to Defeat Artist’s Block and Writer’s Block
How to create a free portfolio and blog site
Learn How to Market Your Art the Right Way
A Collection of Great iOS Apps for Artists
Community Tested Social Networking Tips for Artists
Artist Utilities
Idea Generator
Visual Reference Boards
Random Color Palettes
Free Habit Tracker Printable
Note, I working to remove Amazon Affiliates and will not add new links to them until I see substantial change in the way big companies like them treat their workers.
Recent Posts / More Useful Links
Art-Res Website / Personal Art Blog / Instagram / Facebook
Inqueries Please feel free to contact me via email for business inqueries. Open to guest writing, collaborations, sponsorship/advertisements.


received a few asks about how i draw tf characters and so finally i sat down and started scratching out some notes :))
i'll add more later on if more people are interested and when i have some time,, but i hope these are somewhat informative ?? of at least my own thought processes when it comes to drawing the robot guys


Thank you! :D I’m glad my tutorials are helpful ^^ Maybe this will help you with hair details and stuff like that (don’t overdo detail stuff though.) Basically, it’s nothing new xD


Well it being black history month is reminding me how I wanted to doodle something like this down for a while. Since it’s been a lil detail I always take notice of in drawings. These are very simple depictions but I hope it’s enough to give the general idea! Feel free to reblog


hey these are some tips for some of the little details in drawing fat folks that some people might not know!
everyone has fat on their bodies so its a worthwhile skill to have, but most art tutorials leave it out. heres some other good tips from artists!!


did you know moa (the hatoful boyfriend creator) has a blog page solely for references of hands?
well now you do, and here it is!


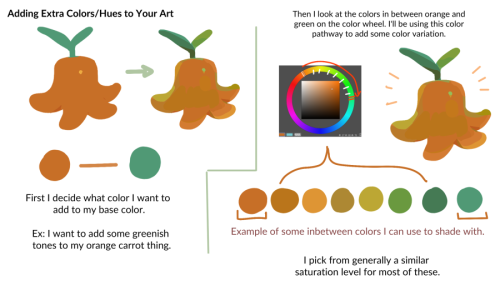
Here's my "lazy" foliage tutorial! 🍀 (I say "lazy" in quotes as I consider this method a shortcut, but still requires some effort for the drawing to look nice)
Gif version of the process:

Thanks for reading!
Main art blog/ Consider tipping me on Ko-fi if you've found this useful!


![[1] Color Zones Of The Face [Tried To Find Source, I Think It’s Here ]](https://64.media.tumblr.com/82181df6330fcb3655a2e40c6c43287a/tumblr_or5nykhGCu1sm0kjdo1_500.png)
![[1] Color Zones Of The Face [Tried To Find Source, I Think It’s Here ]](https://64.media.tumblr.com/1703500f3e1292e370eda4d4cb761252/tumblr_or5nykhGCu1sm0kjdo2_1280.jpg)
[1] Color Zones of the Face [Tried to find source, I think it’s here ]
[2] Navate’s Skin Chart Supplement – the actual tutorials are: Section I: Skin Basics & Section II: Skin tones
Two brilliant skin tutorials. Do not use flat colors for skin! Underpainting is important for realistic, vivid skin. Remember, underneath your skin is fat, muscles, red blood, blue veins, bones.
Consider reblogging this to support the original artist. I recommend following them as well!
More Helpful links: Ask a Question/Request a Tut | Submit a Tutorial | Promote Your Art Commissions to +18.3 K Dashes | Stay Updated on DeviantArt! | Visit me @astrikos


following my meme post the other day, and talking to friends further on the subject of fat characters in art, especially in fandom, i figured some people might like a tutorial on how to draw them.
art cheats
hello i am here today to not lose track of the art cheats i have discovered over the years. what i call art cheat is actually a cool filter/coloring style/way to shade/etc. that singlehandedly makes art like 20 times better
80’s anime style
glitch effect
glow effects
adding colors to grayscale paintings
foreshortening ( coil )
foreshortening ( perspective )
clipping group (lines)
clipping group (colors)
dramatic lighting ( GOOD )
shading metal
lighting faces
that is all for today, do stay tuned as i am always hunting for cool shit like this
Holt shit your art is amazing, whered you learn to do backgrounds? Any tips?
Thanks! I just love how Kaye_bin and Vasili Zorin draw backgrounds. Wish one day I'll do something like them and will understand colors as they do. In almost all artworks recently posted, I just tried to draw as many details as I can in a sketch or line work stages. Then prayed to all Gods it will work in a color stage and used a lot adjustment layers :D Right now I am trying to change this workflow and do a little color sketch before start to work with lines. I think all next artwork will be done this way, I'll try to save some steps or timelapse. These are some quick studies I did from games, artists, photos, just to make myself used to draw color sketch first.

Then I tried to use this pipeline on some fast doodles, like this one:


And right now I wanna try to draw something bigger and detailed with this method. Will see how it goes :3


I find monthly art challenges exhausting, but also love a little structured kick in the ass, so for the past month and a half I've been setting weekly challenges for myself. First one: fill a sketchbook page a day with quick poses off Pose Maniacs.
It's a redux of my first figure drawing class exercise as a teen: get from the top of the head to the heel of the foot in the allotted time. All the poses above were 10-30 seconds. Never hurts to get back to basics every so often~
(Although, in that first class, the professor made us go outside and grab twigs that we had to dip in ink to draw with, so we wouldn't get precious about our line work. I'm not THAT ascetic this time around, lol.)


Art Help

I redid this list because broken links 💀
General Tips
Stretch your fingers and hands
Art is for fun
Never too late to start/improve
Using a tablet
Editing software: pictures & video
Moodboard resources
Comic pacing
Watercolor
Coloring
Color Theory (not children's hospital)
Resources: coloring things a different color
Gold
Dark Skin undertones
Dark Skin in pastel art
POC Blush tones
Eyes colors
Human Anatomy
POSE REFERENCES
Wizard Battle poses
Shoulders
Tips for practicing anatomy
Proportional Limbs
Skeletons
Hair Directions
Afro, 4C hair
Clothing
Long skirts
Traditional Chinese Hanfu (clothing reference)
CLOTHING REFERENCE
Sewing information
Animals
Horse -> Dragon
Snouts: dogs, cats, wolves, fox
Foot, paw, hoof
More
Drawing references sources
Art tutorial Masterlist
Another art tutorial Masterlist
Inspiration: father recreates son's art
Inspiration: Lights
ART BOOKS
Plants/flowers: North America, Hawaii, Patagonia


These brushes aren’t the most complex, but they are what I made on the fly to make drawing hair easier, instead of hand drawing every detail like I’ve done most of my life lmao.
You can find the png files for a bitmap here, along with screenshots of my settings [I use this brush in Medibang Paint Pro, a free art program]. My settings use it as a scatter watercolour, I think it works well with the watercolor for color blending but you could theoretically use it just as a scatter.
Though, the brush settings are something not that important: the size, particle size, scatter strength, opacity, compliment, and color mixing are all things I change frequently when working.
Free to use, just don’t claim as your own. If you want to support me, you can leave a tip at my Kofi.
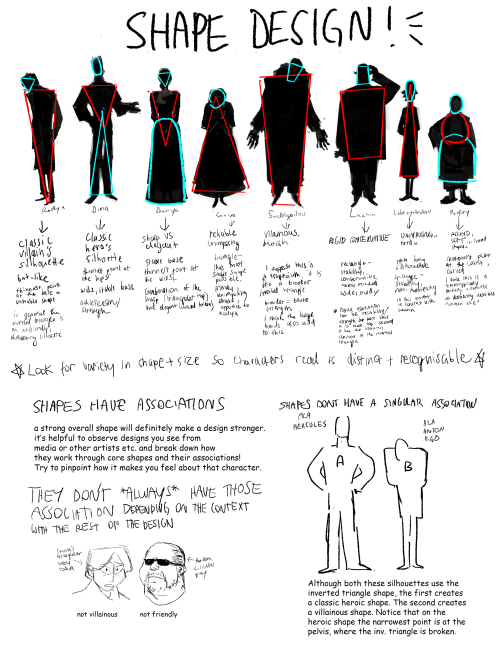
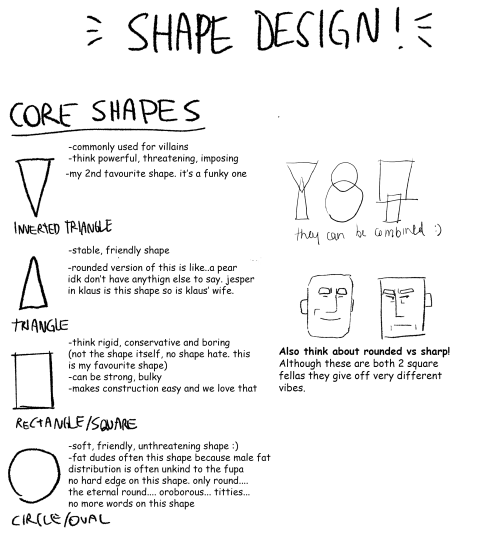
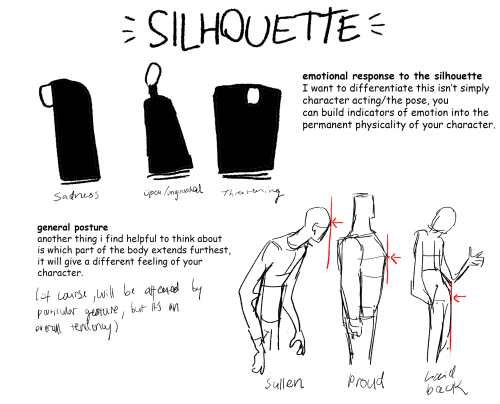
Part 2 of cino art tips is some basic tips on shape and silhouette design which are also principles I think about a lot :)
(also i'm so sorry i chose comic sans to write this in idk what i was thinking but i already flattened the layers)
i don't have any other obvious tips off the top of my head rn but feel free to ask anything you are curious about! i love getting asks uwu


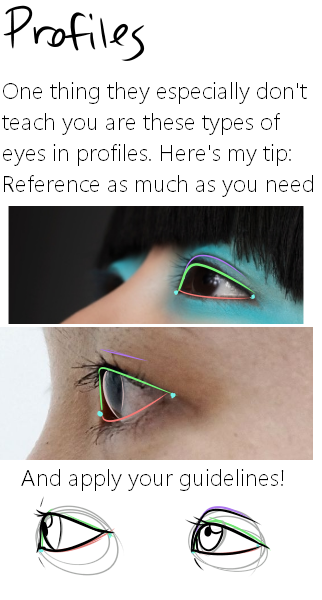
Here it is, my long winded tutorial, complete with some step by step action. I see a lot of people talk about wanting to diversify their artwork but not knowing how. This is my help to you. You really should take the time to invest in learning diverse eye shapes as diverse artwork always makes you a better artist. And frankly I’m really tired of drawing tutorials that talk up character diversity but only have the stereotypical “one Asian eye”.
I did some step by steps for those three diagrams, but I actually got them from this blog which has 14 of those examples! (Bonus: it’s a makeup blog so if you need help with that or want some idea of how to shade these eyes, there ya go)


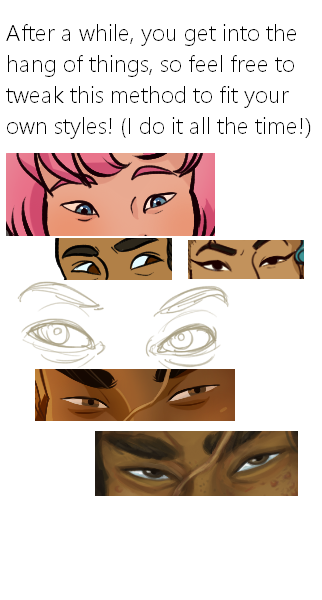
Very happy to finally post my second tutorial ! You guys have been so kind the last time and I really hope this helps some of you in your art path 🙇♀️


Made this lil thing to celebrate hitting 1500 followers on twitter.
hehe
monkey brain like round number

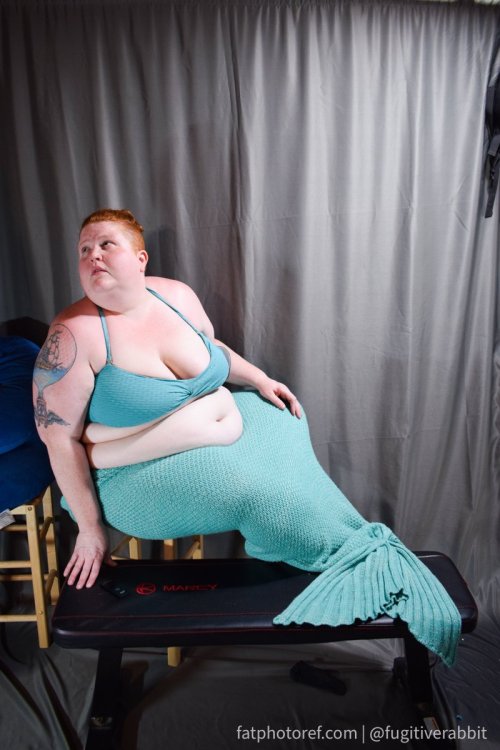


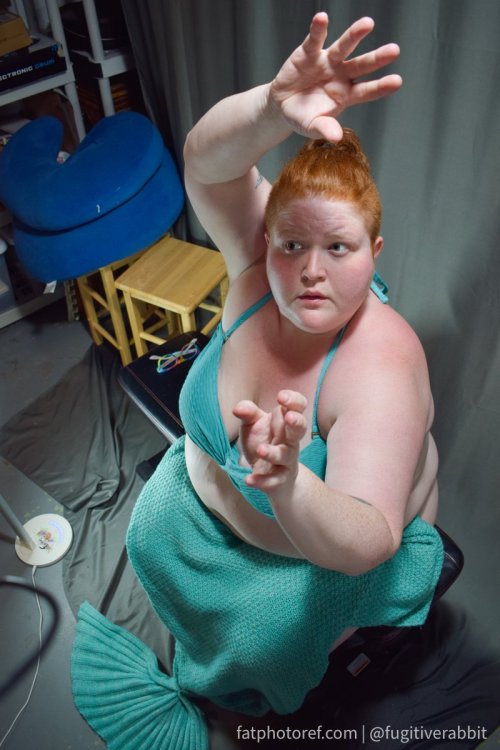
Just a reminder about fatphotoref.com—it exists!! I'll be updating with new photos next week and hopefully more regularly after that. Request access by going to bit.ly/fpraccess 💙🧜♀️ happy mer may!